Price Update module
Menu Path: Inventory -> Utilities -> Price Updates
The price update module provides a staging area where pricing information can be imported, verified and manipulated before being applied to the inventory master. The price update module works in conjunction with the Class Code auto pricing feature to calculate price levels based on either cost or retail price. It also allows for importing a vendor specific price that will be loaded into the vendor (nvavn) tab in inventory.
The main list screen displays any existing price update records and provides buttons to Load, Auto Price, and Update Inventory. The contextual menu on the list of records provides an option to clear the update record database, as these records are essentially “throw away” once inventory has been updated.

The three main processing buttons at the bottom of the screen represent the main steps in importing and applying price updates.

Load: opens a window where you can select a tab-delimited file and specify which fields correspond to which columns in the file.
Auto Price: Applies the auto pricing formulas from the inventory Class Codes to the price update records. It will add location-specific records as needed if there is location-specific pricing in the class code.
Update INV: Updates the inventory master with price values from the update records.
Load File window:
Pressing the Load button on the main list screen will open the Load File window.
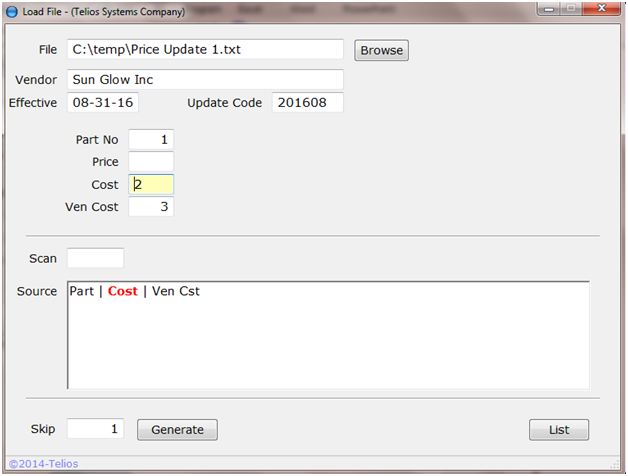
Here you can set up the file to use and map the columns to the various fields in the price update record.
File/Browse: Enter the (tab-delimited) file name to load, or browse for the file.
Vendor: (optional) Enter the vendor to be associated with this pricing.
Effective: the effective date for this price update. Updates are applied by effective date. This allows you to have multiple price updates being staged, but apply them separately.
Update Code: a 6-character designation for this update. It will be loaded into the inventory master for each part number affected by the update.
Part No: The column number in the file where the part number will be found.
Price: (optional) The column number for the price, if present in the file.
Cost: (optional) The column number for the cost, if present in the file.
Ven Cost: (optional) The column number for the vendor-specific cost, if present in the file. Only applicable if the vendor has been filled in.
Mapping Fields
Once you select a file to import, the first line of the file will be displayed in the “Source” field, with each column designated by “|” pipe symbols.
You can view the contents of the file a line at a time by changing the value in the “Scan” field. Use the following keystrokes to navigate the file:
- N – Next record (increment the value).
- P – Previous record
- B – Go to the Beginning of the file
- E – Go to the End of the file
You can set the column number for each field (Part No, Price, Cost, Ven Cost) by typing the number into each field or by clicking into the field and then clicking the corresponding column in the Source display. You can also use the Page-Up and Page-Down keys to increment or decrement the column number.
Import the Data
Set the number of lines at the top of the file to skip in the Skip field (to ignore column headers, for example) and press Generate. The number of records processed will display next to the Generate button. Press the List button to return to the main list screen.
Auto Pricing
Press the Auto Price button to apply the price formulas from the Class Codes, if applicable.
Apply the Price Updates
Press the Update INV button to update inventory. It will first display a prompt for the Effective date to apply. The button label will change to “Execute?”. Press the button again to apply the price changes.